Keep Your Cool: The Ultimate Guide to CPU Coolers
A CPU cooler is an essential component for any computer, responsible for dissipating the heat generated by the Central Processing Unit (CPU). Without an effective cooling solution, your CPU can overheat, leading to performance throttling, instability, and potentially permanent damage. This guide delves into the world of CPU coolers, exploring their types, how they work, key considerations for choosing the right one, and best practices for installation and maintenance to ensure your system runs smoothly and efficiently.
The Critical Role of CPU Cooling
The CPU, often referred to as the “brain” of the computer, performs billions of calculations per second. This intense activity generates a significant amount of heat. Modern CPUs are designed with thermal limits, and once these limits are approached, the CPU automatically reduces its clock speed (throttling) to prevent damage. While this protective mechanism is crucial, it also means your computer won’t be performing at its full potential. Furthermore, prolonged exposure to high temperatures can degrade the lifespan of your CPU and other components. A good CPU cooler ensures consistent performance, extends component longevity, and contributes to overall system stability.
Types of CPU Coolers
There are primarily two main types of CPU coolers: air coolers and liquid coolers (also known as AIOs or custom loops). Each has its own set of advantages and disadvantages.
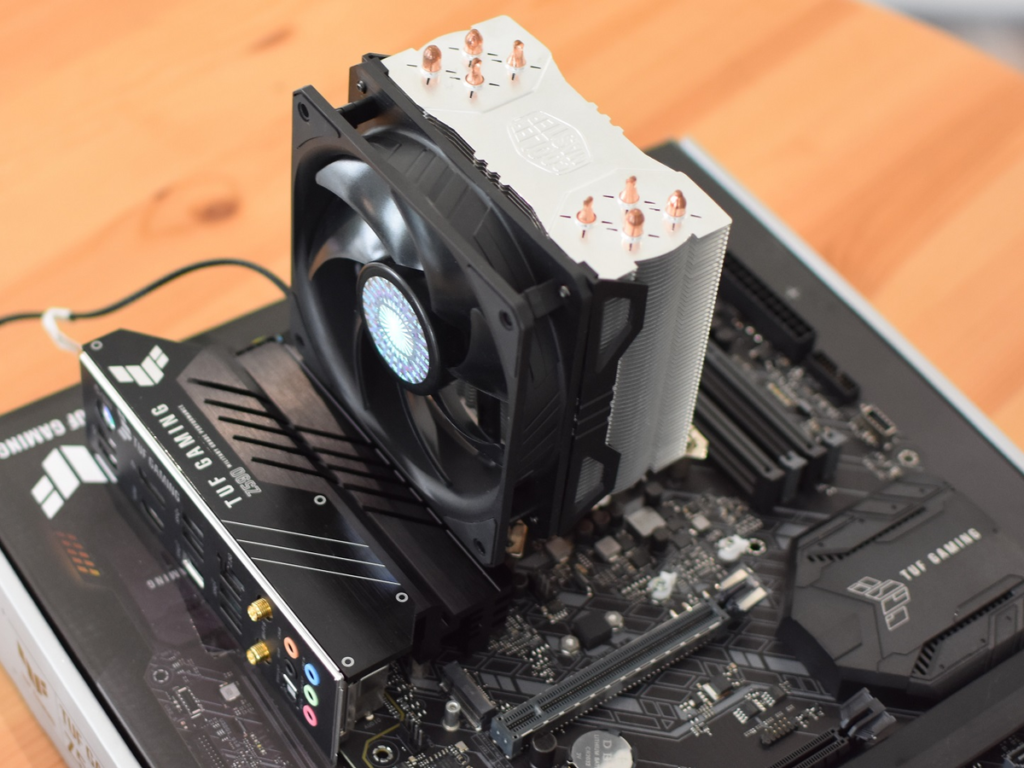
1. Air Coolers
Air coolers are the most common and generally more affordable type of CPU cooler. They work by transferring heat from the CPU to a heatsink, which then dissipates the heat into the surrounding air with the help of a fan.
-
How they work:
- Base Plate: A copper or aluminum base plate makes direct contact with the CPU’s Integrated Heat Spreader (IHS). Thermal paste is applied between the two surfaces to fill microscopic imperfections and maximize heat transfer.
- Heat Pipes: These are typically copper tubes containing a small amount of liquid. The liquid evaporates at the hot end (connected to the base plate), travels to the cooler fins, condenses, and releases heat. The condensed liquid then returns to the hot end to repeat the cycle.
- Heatsink Fins: Usually made of aluminum, these fins provide a large surface area for heat dissipation.
- Fan(s): One or more fans are mounted on the heatsink to push air through the fins, accelerating the heat transfer process.
-
Advantages:
- Affordability: Generally less expensive than liquid coolers.
- Reliability: Fewer moving parts means less chance of failure (no pumps to break, no liquid to leak).
- Ease of Installation: Often simpler to install than liquid cooling solutions.
- No Maintenance: Beyond occasional dusting, air coolers require virtually no maintenance.
- Passive Cooling Potential: Some large air coolers can offer decent cooling with minimal fan speeds, leading to quieter operation.
-
Disadvantages:
- Size: High-performance air coolers can be very large and bulky, potentially interfering with RAM slots or case side panels.
- Aesthetics: Some users find them less visually appealing than sleek AIOs.
- Limited Overclocking Headroom: While powerful, they might not offer the same ultimate cooling capacity as high-end liquid coolers, especially for extreme overclocking.
2. Liquid Coolers (AIOs and Custom Loops)
Liquid coolers use a liquid coolant to transfer heat away from the CPU.
-
All-in-One (AIO) Liquid Coolers: These are sealed, self-contained units that come pre-filled with coolant. They are a popular choice for users who want the benefits of liquid cooling without the complexity of building a custom loop.
- How they work:
- Cold Plate/Pump Block: A block that sits on the CPU, containing a cold plate that absorbs heat and a pump that circulates the coolant.
- Tubing: Flexible tubing connects the pump block to the radiator.
- Radiator: A series of fins and channels through which the hot coolant flows, dissipating heat to the air.
- Fans: Mounted on the radiator to push air through the fins.
- Advantages:
- Superior Cooling Performance: Generally offer better cooling, especially for heavily overclocked CPUs or high-end processors.
- Aesthetics: Often provide a cleaner, sleeker look inside the case.
- Space Saving (around CPU socket): While radiators can be large, the area around the CPU socket is less obstructed compared to large air coolers.
- Quieter Operation (at idle): Pumps are typically quiet, and fans can spin slower at low loads.
- Disadvantages:
- Higher Cost: More expensive than comparable air coolers.
- More Complex Installation: Can be more challenging to install due to radiator mounting and cable management.
- Potential for Failure: Pumps can fail, and while rare, leaks can occur.
- Pump Noise: While generally quiet, some users might notice pump whine.
- How they work:
-
Custom Liquid Cooling Loops: These are highly customizable systems where users select individual components (CPU block, GPU block, pump, reservoir, radiator, tubing, fittings, coolant) and assemble them. They offer the best possible cooling performance and aesthetic flexibility.
- Advantages:
- Unmatched Cooling Performance: The absolute best cooling solution available, capable of cooling multiple components (CPU, GPU, RAM, etc.).
- Ultimate Customization: Allows for unique designs and aesthetics.
- Lower Noise (potentially): With large radiators and low fan speeds, custom loops can be extremely quiet.
- Disadvantages:
- Very High Cost: Significantly more expensive than AIOs or air coolers.
- Complex Installation and Maintenance: Requires advanced knowledge, time, and ongoing maintenance (draining, refilling, cleaning).
- Risk of Leaks: Higher risk of leaks due to numerous connections.
- Time-Consuming: Building and maintaining a custom loop is a time-intensive hobby.
- Advantages:
Key Considerations When Choosing a CPU Cooler
Selecting the right CPU cooler involves balancing performance, budget, compatibility, and aesthetics.
1. CPU TDP (Thermal Design Power)
The TDP of your CPU indicates the maximum amount of heat it can generate under typical workloads. Your cooler’s cooling capacity (measured in Watts) should ideally exceed your CPU’s TDP to ensure efficient heat dissipation. High-end CPUs like Intel i9 or AMD Ryzen 9 often require robust cooling solutions, while lower-TDP CPUs can get by with more modest coolers.
2. Socket Compatibility
Different CPU manufacturers (Intel and AMD) use different socket types (e.g., LGA 1700 for Intel, AM5 for AMD). Ensure the cooler you choose supports your CPU’s specific socket. Most coolers come with mounting hardware for multiple sockets. For more details on specific socket types, check out this guide on Intel vs AMD sockets.
3. Case Compatibility
- Air Coolers: Check the maximum cooler height supported by your PC case. Tall air coolers can interfere with the side panel.
- Liquid Coolers: For AIOs, ensure your case has mounting points for the radiator size you plan to use (e.g., 120mm, 240mm, 280mm, 360mm). Radiators can be mounted in the front, top, or rear of the case depending on the model.
4. RAM Clearance
Large air coolers can sometimes overhang RAM slots, potentially preventing the use of tall RAM modules with elaborate heatspreaders. Check the cooler’s specifications for RAM clearance.
5. Noise Levels
Fan size, fan speed, and bearing type all influence noise levels. Larger fans can move more air at lower RPMs, leading to quieter operation. Some coolers come with low-noise adapters or fan curves that prioritize quietness. Pump noise is also a factor for liquid coolers. For a deeper dive into fan types and their impact on noise, consider exploring resources on PC fan technology.
6. Overclocking Plans
If you plan to heavily overclock your CPU, you’ll need a more powerful cooler to handle the increased heat output. High-end air coolers or AIO liquid coolers are typically recommended for serious overclocking.
7. Aesthetics and RGB
Many modern coolers feature RGB lighting on the fans, pump block, or both, allowing for customization to match your build’s theme. Some users prioritize a clean, minimalistic look, while others prefer vibrant lighting.
8. Budget
CPU coolers range widely in price. Determine your budget and look for the best performance and features within that range. Remember that spending more doesn’t always guarantee significantly better performance, especially if you’re not pushing your CPU to its limits.
Thermal Paste: The Unsung Hero
Thermal paste, also known as thermal compound or TIM (Thermal Interface Material), is crucial for efficient heat transfer from your CPU’s IHS to the cooler’s base plate. It fills the microscopic air gaps that exist between the two surfaces, which would otherwise act as insulators. A small, pea-sized dot or a thin line in the center of the CPU is typically sufficient. Too much or too little can negatively impact performance. For proper application techniques, many online tutorials and guides are available.
Installation and Maintenance Tips
Installation:
- Cleanliness is Key: Ensure both the CPU IHS and the cooler base plate are perfectly clean and free of dust or old thermal paste. Use isopropyl alcohol and a lint-free cloth.
- Apply Thermal Paste Correctly: Apply a small amount (pea-sized or thin line) to the center of the CPU. Do not spread it manually unless specifically instructed by the thermal paste manufacturer. The pressure from the cooler will spread it evenly.
- Follow Manufacturer Instructions: Each cooler has specific mounting hardware and steps. Carefully read and follow the manufacturer’s installation guide.
- Secure Mounting: Ensure the cooler is mounted securely and evenly to the motherboard. Uneven pressure can lead to poor contact and ineffective cooling.
- Fan Orientation: For air coolers, ensure the fans are oriented to push air through the heatsink in the correct direction (usually front-to-back or bottom-to-top, depending on case airflow). For AIOs, consider radiator fan orientation for optimal airflow (intake or exhaust).
- Cable Management: Route fan and pump cables neatly to avoid obstructing airflow or appearing messy.
Maintenance:
- Dust Removal: Regularly clean dust from the heatsink fins and fans using compressed air or a soft brush. Dust buildup significantly reduces cooling efficiency.
- Fan Inspection: Check fans periodically for any signs of wear, rattling noises, or reduced RPMs.
- Thermal Paste Reapplication (Optional): While not strictly necessary for every build, reapplying thermal paste every few years (or if you remove the cooler for any reason) can help maintain optimal performance, especially if you notice rising temperatures.
- Liquid Cooler Inspection (for AIOs): Periodically check tubing for kinks or leaks (though leaks are rare). Listen for unusual pump noises.
- Custom Loop Maintenance: Custom liquid loops require more frequent maintenance, including draining, cleaning, and refilling the coolant, typically every 6-12 months.
Conclusion
A well-chosen and properly installed CPU cooler is fundamental to the health and performance of your computer. Whether you opt for a robust air cooler or a sleek liquid cooling solution, understanding your CPU’s needs, your case’s limitations, and your personal preferences will guide you to the perfect choice. By investing in quality cooling and following proper maintenance practices, you’ll ensure your CPU runs cool, stable, and at its peak performance for years to come. Remember, a cool CPU is a happy CPU, leading to a more reliable and enjoyable computing experience.
Check out our latest posts !